How can we help?
Gifts, Credits, & Promotions
Gift Cards
-
Head to the 'Gift Cards' page from the Menu and select 'Buy gift card'. You can choose from our pre-set amounts or feel free to purchase a custom amount. Provide the recipients email, gift message and the desired date to send the card, and we'll take care of the rest.
-
Once you've created an account, head to the 'Gift Cards' section of your 'Account' where you can redeem your Blue Apron gift card. Once it has been successfully applied to your account, you should see the gift in the 'Credits' section of your Account. Funds will apply automatically to your next purchase.
-
You can use your gift card balance toward your order total for any items on the Blue Apron app or website.
-
Blue Apron gift cards don’t expire and there is no deadline to use them.
-
Yes – you can email a Blue Apron gift card to the recipient immediately upon purchase or schedule the email for a future date. You’ll see these options prior to confirmation when purchasing a gift card.
Orders & Account Management
Blue Apron+ Membership
-
With Blue Apron+, you get free shipping on all orders, free membership to Tastemade+ where you can stream unlimited food, travel, and home shows, and exclusive access to member only items, experiences, and perks. Blue Apron+ is $9.99 per month, meaning it pays for itself in just one order.
-
Head to the Blue Apron+ page and click ‘Start your 30-day free trial’ to sign up. If you’ve used Blue Apron+ in the past, you can always restart your membership in your account settings.
-
You can try out a Blue Apron+ membership for 30 days by following the link on the Blue Apron+ page, and you can cancel or restart your membership at any time in your account settings.
-
To cancel your Blue Apron+ membership, head to your 'Account' and select 'Blue Apron+' from the menu. Next, click 'Cancel Membership' at the bottom of the screen and follow the prompts to complete your cancellation.
Autoship & Save
-
This is a test. Ready to be published.
-
To enroll in Autoship deliveries, head to your ‘Account’ Page when signed in on the website or from the mobile app. From there, tap the ‘Autoship & save’ section.
-
Autoship orders will be charged once your order cutoff time passes and your order processes. You can see the cutoff time for your Autoship orders on your ‘Orders’ page below each scheduled delivery date.
-
Head to your 'Orders' page and select the week you're interested in skipping. Once there, click the 'Skip' button at the top of your screen and follow the prompts that follow. Once complete, you'll see the order marked as 'Skipped' on your 'Orders' page.
-
To cancel Autoship deliveries, head to your 'Account' and select 'Autoship & Save' from the menu. Next, click 'Cancel Plan' at the bottom of the screen and follow the prompts to cancel your automated orders.
About Blue Apron
How it Works
-
This is a test. Ready to be published.
General
FAQ
-
You can use our Knowledge Capture app to leverage your team’s collective knowledge.
Using the app, agents can:
- Search the Help Center without leaving the ticket
- Insert links to relevant Help Center articles in ticket comments
- Add inline feedback to existing articles that need updates
- Create new articles while answering tickets using a pre-defined template
Agents never have to leave the ticket interface to share, flag, or create knowledge, so they can help the customer, while also improving your self-service offerings for other customers.
To get started, see our Knowledge Capture documentation.
And before your agents can start creating new knowledge directly from tickets, you’ll need to create a template for them to use. To help you along, we’ve provided some template ideas below. You can copy and paste any sample template below into a new article, add the KCTemplate label to the article, and you’ll be all set.
Q&A template:
[Title]
Question
write the question here.Answer
write the answer here.Solution template:
[Title]
Symptoms
write the symptoms here.Resolution
write the resolution here.Cause
write the cause here.How-to template:
[Title]
Objective
write the purpose or task here.Procedure
write the steps here. -
If you have configured your Help Center to support multiple languages, you can publish content in your supported languages.
Here's the workflow for localizing your Help Center content into other languages:
- Get your content translated in the other languages.
- Configure the Help Center to support all your languages.
- Add the translated content to the Help Center.
For complete instructions, see Localizing the Help Center.
-
You can modify the look and feel of your Help Center by changing colors and fonts. See Branding your Help Center to learn how.
You can also change the design of your Help Center. If you're comfortable working with page code, you can dig in to the site's HTML, CSS, and Javascript to customize your theme. To get started, see Customizing the Help Center.
-
This FAQ is a section in the General category of your help center knowledge base. We created this category and a few common sections to help you get started with your Help Center.
The knowledge base in the Help Center consists of three main page types: category pages, section pages, and articles. Here's the structure:
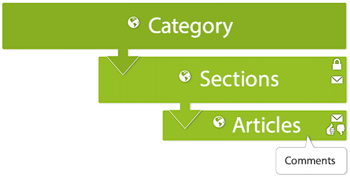
You can create your own categories, sections, and articles and modify or completely delete ours. See the Organizing knowledge base content and Creating articles in the Help Center to learn how.
Announcements
-
You're looking at your new Help Center. We populated it with placeholder content to help you get started. Feel free to edit or delete this content.
The Help Center is designed to provide a complete self-service support option for your customers. The Help Center contains: a knowledge base and, on Guide Professional and Enterprise, a Customer Portal for support requests. You can also add a community to your Help Center if you have Zendesk Gather.
Your customers can search for knowledge base articles to learn a task or search the community, if available, to ask fellow users questions. If your customers can't find an answer, they can submit a support request.
For more information, see Help Center guide for end users.
Each user has a Help Center profile (Guide Professional and Enterprise), so your Help Center users can get to know one another better. Profiles contain relevant information about the user, along with their activities and contributions.